South Valley Sand Volleyball League
Constructing a sand volleyball court
Below is an article that appeared in Volleyballmag.com in August 1995
Court Cents
Here's the complete guide to building your own sand court, including what it's going to cost.
By C.C. Sandorfi
After fielding calls and letters from readers for three years now, we've decided it's time for an encore presentation of one of our most popular subjects: how to build your own sand volleyball court. But be forewarned: This is not a project to undertake in half measures. If you're planning to put in a court, do it right, and be prepared to invest a fair amount of time and money. Otherwise, you could end up with the world's most expensive sand box.
The Basics
- The playing area consists of the court and a space around it measuring approximately 10 feet in each direction (more if possible). The space above the playing area should be free of obstructions (branches, power lines, etc.). The playing area should be level. It's important to use good quality sand, thick enough to prevent players from contacting any underlying hard surface.
- Dimensions of a standard court are 18 meters (59-0 feet) by nine meters (29-6) and are measured from the outer edge of the boundary lines. The boundary lines should be made of brightly colored rope or material having similar characteristics but shouldn't unreasonably impede play.
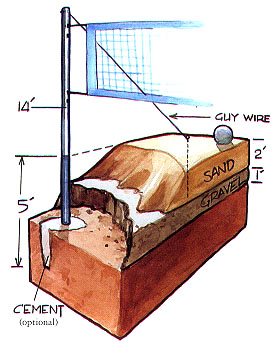
- Net supports should be made of wood, metal, PVC or other material that will withstand tension and not bend or break. Supports should be about 14 feet long and buried five feet deep (cement is optional). Make sure they're free of hazardous protrusions. If you use guy wires, they should be made of bright colors or marked with flags so they're visible. All anchors for guy wires and court lines should be level with the playing surface and free of sharp edges.
- For areas comfortably above sea level, the court area should be excavated two to three feet deep, depending on the depth of the sand and gravel base you intend to use. For low-lying areas, the court area should be excavated only about six to eight inches; you should end up building an elevated court rather than one that is flush with the ground.
- To keep dirt or grass from mixing in with the court sand, you may want to build a barrier around the court, either with wooden beams (such as railroad ties) or some type of low, solid fencing. This can be especially important for a court that is built slightly above ground.
- You should have a drainage system under the court. A drainage ditch should lead away from the lowest point of the court, and perforated drainage pipe should be laid in a zig-zag pattern over the base of the area with one end capped and the other open to the drainage ditch. Drainage is very important. You don't want to be playing in a swamp.
 |
| Illustration by Darren Henke |
Step by Step
- Excavate the court area to your desired depth using a Bobcat or front-end loader. Our experts all advise against using a bulldozer or backhoe (the bulldozer won't be able to pick up and replace the dirt, and the backhoe won't dig a level surface). If you're in a low sea-level area (for example, shoreline areas in Florida), the court should be built slightly above ground. Use the dirt you excavate to create a slight slope up to the court.
- Arrange your court perimeter (if desired) around the edges of the excavated site. This keeps dirt and grass from leaking into the court and vice-versa. If you're using railroad ties or similar materials, our experts suggest covering the exposed top edges with some sort of padding to minimize injury potential. One expert says he's had great luck buying used rubber escalator handrail material from escalator companies and seating it atop his 2 x 6-inch wooden boundaries.
- Lay out your drainage pipe, perforated side down, with the open end at the low point of the court. You may wish to wrap each section of pipe with some type of filter to keep sand from filling up the pipe: burlap is one choice although eventually it will rot. Our experts suggest using flex wrap or "handicap wrap," which can be bought at plumbing supply houses.
- Prepare your net standards by attaching hooks, hook-and-eye hardware and any winch-type hardware. Sink your poles at least three feet deep since they'll need to be sunk five feet overall when you're finished. For longevity, if you're using wooden poles you should pre-treat them with a weather-resistant stain. If you're not using guy wires as supports, set your poles in the ground at a slight angle outward from the court to allow for any "bend" caused by eventual net tension.
- Cover the pipe and the remaining court area with a one-foot thickness of small gravel. Various sizes seem to work, but the overall consensus is to use a small, pea-sized gravel known around the country as #56 gravel, #2 or #3 size gravel. Explain to your gravel supplier that it will be used for drainage, and he can recommend the size for your needs.
- Cover the gravel with a screen-type filter to keep gravel and dirt from working its way up to the sand level. Again, burlap will work, but it will eventually rot, especially if you get a lot of rain. The best material is ground stabilization filter fabric, which is a woven poly-blend that won't deteriorate. You can find a supplier by calling a landscaping or excavating company for a referral.
- Deposit your sand - one to two feet deep - and rake so it's level. With a good gravel base, one foot of sand is usually enough.
- Attach your net, put down your boundary lines and you're ready to play.
Tips from Our Experts
John Daloise, president of Standard Building Systems and local promoter for the Bud Light Pro Beach 4s and WPVA, Dallas:
- It's best to hire a contractor if you're unfamiliar with the excavating equipment. It'll save you time and headaches in the long run.
- One foot of sand is usually enough; if you put down more, you won't be able to reach the lower levels with a rototiller or rake.
- Don't use sugar sand-it sticks too much and is too fine to be a good playing surface.
Richard Anderson, vice-chair of Olympic Committee for Clayton County, Jonesboro, Georgia:
- Try using used escalator handrail material for padding on the court borders.
- Rake your court frequently with a three-foot garden rake.
- Use a net with steel cable both on top and bottom for maximum tightness.
J.B. Shares, owner, Hot Shots beach volleyball clubs, Rochester, New York:
- Pay special attention to the plans and follow them line by line. Don't cut corners or it'll cost you in the long run.
- If you use steel poles for net standards, seat them in steel sleeves so you can easily remove the poles for maintenance or replacement.
- If your net has steel cables, use pulleys on each side to hold it tight.
Robert "La Jolla Bob" Roemer, owner, La Jolla Beach Volleyball Club, Toledo, Ohio:
- Go with round poles whenever possible to reduce injury risks; try used utility poles (you can get them for free in many communities by contacting the utility companies).
- Allow plenty of space for a sand perimeter around the court - don't let grass or dirt serve as your perimeter.
- Watch out for freebies. Sometimes free sand can be more expensive than purchased sand because removing or sifting debris from the sand will be more expensive in the long run.
Dale Hoffman, president, California Beach Volleyball Association, Ventura, California:
- Always put in proper drainage.
- Use the simplest net attachment system possible. In Brazil, they cut a notch in the top of the pole and drill a hole in the middle, string the net cable and rope over the top of the pole and knot it off at the hole.
- Choose your site carefully. Putting a court near a busy road or a swimming pool isn't a great idea.
How Much?
Now for the big question: How much? Your basic costs will fall into three categories: sand and gravel, excavation equipment rental and court equipment.
If you're lucky enough to live on a coast, sand will probably be readily available at a reasonable cost. But unless you want to spend a lot of time with a shovel and a pickup truck at the beach, you'll need to purchase sand from a local sand pit or milling company (check your yellow pages).
Sand comes in several grades, but our volleyball experts say this isn't the place to cut corners. Washed plaster sand, washed masonry sand, washed river sand or, if possible, washed beach or dune sand are recommended.
Sand is sold either by the ton or by the yard, depending on where you live. On average, washed masonry sand will cost between $8.50 and $15 a ton, not including delivery. And delivery is where the hidden costs lie. If you're nearby, it can be $2 or $3 per ton. As you get farther away, the cost escalate. If you're in the Midwest, for instance, the sand might have to be shipped by freighter and then trucked to your location, raising the cost considerably.
You can calculate how much sand you'll need using the following formula: (Length x Width x Depth in feet divided by 27) x 1.6 gives you tonnage; (L x W x D) divided by 27 gives you yardage. Using this formula, a court approximately 40 x 70 feet with one foot of sand needs about 166 tons of sand.
Gravel can be slightly cheaper, ranging from $5 to $14 per ton, although in some areas it can cost more than the sand. The formula for calculating the tonnage needed is the same as for sand. Delivery charges are similar.
When it comes to digging your court, you'll find that all your friends armed with shovels won't compare to a Bobcat or front-end loader. Our panel says a Bobcat is ideal because of its compact size and easy maneuverability.
If you're doing the digging yourself, expect to pay somewhere between $100 and $200 a day for Bobcat rental, plus a delivery fee of $40 to $100. You can also contract the work out to an excavation or landscaping company. It costs more, but you're getting a trained professional who can probably do the job much faster and won't take out a corner of your house in the process.
Considering the investment, you should purchase a net with top and bottom steel cables ($100 to $300) and good-quality supports. For standards, 4 x 6-inch wooden posts are favored ($20 each). Steel supports are also an option.
The final price tag: Expect to spend $6,000-$10,000.
Costs by Region
Dallas
- Sand: $10-17/yard delivered
- Gravel: $22-30/yard delivered
- Bobcat rental: $130/day plus $50-60 delivery fee
Toledo, Ohio
- Sand: $15/ton delivered
- Gravel: $6.95/ton plus delivery
- Bobcat rental: $112/day plus $50/hr. for delivery
Atlanta
- Sand: $16/ton delivered
- Gravel: $12.50/ton plus delivery
- Bobcat rental: $135/day, $1.50 per mile for delivery
Southern California
- Sand: $8.50-11/ton plus delivery
- Gravel: $9/ton plus delivery
- Bobcat rental: $190/day plus $100 delivery charge
Rochester, New York
- Sand: $8.50-9.50/ton plus $2-$3/ton delivery
- Gravel: $6-7/ton plus delivery
- Bobcat: $185/day plus $45 delivery charge